Showing posts with label RTEMS. Show all posts

Tuesday, October 31, 2017

RISC-V RTEMS port is Upstream


Introduction

Having the RISC-V's GCC and Binutils upstream, as well as the increasing popularity and support RISC-V is getting pushed us to upstream RTEMS/RISC-V port, and it is gonna be part of the upcoming major RTEMS release.

RTEMS (The Real-Time Executive for Multiprocessor Systems) is a contemporary Real-time embedded OS, started as a project back in 1988. Since then, it has been used in space (e.g. by NASA), military, robotics and many other embedded applications.

This blog post gives a brief status of the porting efforts (that's upstream), as well as a quick how to build/run the port on Spike.

Status

[RTEMS Kernel/OS]

  • Compatible with RISC-V priv-1.10.
  • Has interrupt support.
  • Only tested on Spike.
  • Only timer ISR is handled.
  • Uses HTIF for console IO, and power off.
  • Works entirely in Machine mode, standalone (doesn't rely on bbl).
  • Tier-2 RTEMS Architecture (For info about different RTEMS Tiers see this).
  • BSD-2 License.
  • Some of the code is copied from riscv-pk. 
The port is divided into 2 main parts:
  • CPU Port (riscv32, and riscv64)
    • General CPU port that can be used by different RISC-V-based boards. 
    • Fairly complete (but not optimized) for single core systems.
  • BSP port (Board Support Package).
    • generic_riscv that runs on Spike.
      • Only timer and console drivers are implemented.
    • generic64_riscv 64-bit of generic_riscv.
Limitations
  • No cache or MMU management.
  • No FPU support.

 [RTEMS Source Builder] Toolchain


RTEMS has, maintains and tests its own toolchain for each CPU architecture (target), which relies on source code upstream from GNU (and others). For example, by using RSB to build RTEMS/RISC-V toolchain, RSB will fetch GCC and Binutils from GNU repos/servers, extract, build and install them for RTEMS. This is an example output after installing the RISC-V/RTEMS toolchain:

Installed riscv*-rtems toolchain (RSB)


We currently use the following revisions/releases for the RISC-V/RTEMS toolchain:

Tools built by RSB for riscv32


Furthermore, Spike/fesvr can be built using RSB (fetched from GitHub).


 [RTEMS Tester]


Scripts have been added to RTEMS Tester in order to be able to run the > 500 RTEMS tests on Spike. Currently, most of the tests pass on Spike.


Final output after running RTEMS Tester on riscv32 port


Stats

Binary sizes

With -Os flag:

minimum.exe (simplest RTEMS app that does nothing)

➜  build riscv32-rtems4.12-size riscv32-rtems4.12/c/riscv_generic/testsuites/samples/minimum/minimum.exe
   text    data     bss     dec     hex filename
  33944    8433 268393028       268435405       fffffcd riscv32-rtems4.12/c/riscv_generic/testsuites/samples/minimum/minimum.exe

hello.exe (Hello World App - Uses console driver, printf)
➜  build riscv32-rtems4.12-size riscv32-rtems4.12/c/riscv_generic/testsuites/samples/hello/hello.exe   
   text    data     bss     dec     hex filename
  75612    7768 268352004       268435384       fffffb8 riscv32-rtems4.12/c/riscv_generic/testsuites/samples/hello/hello.exe


ticker.exe (Uses clock driver and console driver, printf)
➜  build riscv32-rtems4.12-size riscv32-rtems4.12/c/riscv_generic/testsuites/samples/ticker/ticker.exe 
   text    data     bss     dec     hex filename
  66480    8744 268360196       268435420       fffffdc riscv32-rtems4.12/c/riscv_generic/testsuites/samples/ticker/ticker.exe


Tests 


RV32


Final output after running RTEMS Tester on riscv32 port

RV64


Final output after running RTEMS Tester on riscv64 port


Takeaways/TODOs

Hardware Platforms: We need to test on actual hardware in order to level up RISC-V/RTEMS port to a Tier-1 architecture (the highest, on par with ARM and x86). Issues with current RISC-V HW platforms (that I know):
  • HiFive1: We had a student working on HiFive1 port this summer part of Google Summer of Code. The main challenge was the memory size limitation.
  • FPGAs: Currently, I'm aware of the Rocket Chip as an FPGA/HW target. It relies on bbl as a bootloader. Furthermore, it changes to S-Mode before jumping to the payload entry. That's not the case for RTEMS as it works in M-Mode.
  • Do you have a RISC-V HW implementation: Please get it touch, we need more RISC-V/HW BSPs (with reasonably big enough memory for RTEMS e.g. > 128KiB). Only M-Mode is needed (for CPU) and console/timer (for BSPs). It would be also great if it can be remotely powered off/reset (for RTEMS Tester).


SMP support: Adding SMP support is easy for OSes working in S-Mode (just calling sbi_xxx functions). However, I've not investigated yet how feasible it is to implement SMP support for M-Mode-based implementations.

QEMU: Hasn't been updated for a while (and not upstream), and the latest privileged mode is 1.9. Tried to run the port on it though, but didn't work.

GDB: Would be great if it's gonna be upstream soon (with target sim?). RSB tries to build GDB for all targets/architectures, which is used part of RTEMS Tester as well (and to run basic sample apps).

Bugs: Will try to go over failed tests from RTEMS Tester and try to fix the bugs, unless someone beats me to it.


Quick HowTo

 To build the tools from source, RTEMS Source Builder is needed.

$ git clone git://git.rtems.org/rtems-source-builder.git
$ cd 
rtems-source-builder

Setup development directories and export PATH:

$ mkdir -p ~/development/rtems
$ export PATH=$HOME/development/rtems/4.12/bin:$PATH
$ export RTEMS_DEV=$HOME/development/


[Build Toolchain]

RV32

rtems-source-builder git:(master) ✗ cd rtems/
$ ../source-builder/sb-set-builder --log=l-riscv32.txt --prefix=$RTEMS_DEV/rtems/4.12 4.12/rtems-riscv32

RV64

$ ../source-builder/sb-set-builder --log=l-riscv64.txt --prefix=$RTEMS_DEV/rtems/4.12 4.12/rtems-riscv64


[Build Spike]

rtems-source-builder git:(master) ✗ cd  bare
$ ../source-builder/sb-set-builder --log=spike --prefix=$RTEMS_DEV/rtems/4.12 devel/spike

[Build RTEMS]

Clone RTEMS:

 $ git clone git://git.rtems.org/rtems.git
 $ cd rtems && ./bootstrap -p && ./bootstrap 

To build generic_riscv BSP (32-bit)

$ cd .. && mkdir build && cd build
$ ../rtems/configure --target=riscv32-rtems4.12  --enable-rtemsbsp=riscv_generic --enable-tests=samples


To build generic64_riscv BSP (64-bit)

$ cd .. && mkdir build64 && cd build64
$ ../rtems/configure --target=riscv64-rtems4.12  --enable-rtemsbsp=riscv64_generic --enable-tests=samples


[Run RTEMS]

RV32


➜  build spike --isa=RV32IMAFDC -m0x10000000:0x10000000 riscv32-rtems4.12/c/riscv_generic/testsuites/samples/hello/hello.exe


RV64


hello.exe (Hello World App - Uses console driver, printf)


➜ build64 spike -m0x10000000:0x10000000 riscv64-rtems4.12/c/riscv64_generic/testsuites/samples/hello/hello.exe
*** BEGIN OF TEST HELLO WORLD ***
Hello World
*** END OF TEST HELLO WOR
LD ***


ticker.exe 

(Uses clock driver and console driver in a multithreading test)


➜ build64 spike -m0x10000000:0x10000000 riscv64 rtems4.12/c/riscv64_generic/testsuites/samples/ticker/ticker.exe
*** BEGIN OF TEST CLOCK TICK ***
TA1 - rtems_clock_get_tod - 09:00:00 12/31/1988
TA2 - rtems_clock_get_tod - 09:00:00 12/31/1988
TA3 - rtems_clock_get_tod - 09:00:00 12/31/1988
TA1 - rtems_clock_get_tod - 09:00:05 12/31/1988
TA1 - rtems_clock_get_tod - 09:00:10 12/31/1988
TA2 - rtems_clock_get_tod - 09:00:10 12/31/1988
TA1 - rtems_clock_get_tod - 09:00:15 12/31/1988
TA3 - rtems_clock_get_tod - 09:00:15 12/31/1988
TA1 - rtems_clock_get_tod - 09:00:20 12/31/1988
TA2 - rtems_clock_get_tod - 09:00:20 12/31/1988
TA1 - rtems_clock_get_tod - 09:00:25 12/31/1988
TA3 - rtems_clock_get_tod - 09:00:30 12/31/1988
TA1 - rtems_clock_get_tod - 09:00:30 12/31/1988
TA2 - rtems_clock_get_tod - 09:00:30 12/31/1988
*** END OF TEST CLOCK TICK ***


[Run RTEMS Tester]


RV32

➜  build $RTEMS_DEV/rtems/rtems-tools/tester/rtems-test --log=riscv_generic.txt --rtems-bsp=riscv_generic --rtems-tools=$RTEMS_DEV/rtems/4.12 --timeout=40 riscv32-rtems4.12/c/riscv_generic/testsuites

RV64
➜  build $RTEMS_DEV/rtems/rtems-tools/tester/rtems-test --log=riscv64_generic.txt --rtems-bsp=riscv64_generic --rtems-tools=$RTEMS_DEV/rtems/4.12 --timeout=40 riscv64-rtems4.12/c/riscv64_generic/testsuites

Tuesday, December 15, 2015

RTEMS port for RISC-V, with/without seL4 support


This is a brief update about RTEMS port progress to RISC-V.

RTEMS port for RISC-V architecture (currently riscv32) runs Hello World and Ticker (with sim timer), on both Spike simulator and seL4 microkernel (two cores). The github repo of the port is here [1].


There are two BSPs currently:

1) riscv_generic: This BSP is intended to run in Machine mode, and has been tested on Spike.

To run it configure and build RTEMS with:

$ ../rtems/configure --target=riscv32-rtems4.12 --disable-posix --disable-networking --disable-itron --enable-rtemsbsp=riscv_generic

$ make

Command to run on Spike:

$ spike --isa=RV32 riscv32-rtems4.11/c/riscv_generic/testsuites/samples/ticker/ticker.exe

2) riscv_seL4: This BSP assumes it runs with support of seL4 microkernel, and it runs in Supervisor mode (on another core). seL4 application would allocate and map memory for it from its untyped memory (userspace), before off-loading it to another core.

To run it with seL4, you need to get seL4-rtems project first, configure it, but before building seL4 two shell variables have to be exported so that seL4 can know about where/which RTEMS image to load.

$ export RTEMS_IMAGE="Absolute path to the RTEMS .exe image"
$ export RTEMS_IMG_NAME="Name of the RTEMS image you would use, i.e hello.exe, ticker.exe"

For how to build/run seL4-rtems project follow the exact same instructions here [2] with the only difference replacing:

repo init -u https://github.com/heshamelmatary/sel4riscv-manifest.git

with

repo init -u https://github.com/heshamelmatary/sel4riscv-rtems-manifest.git

Which fetches the seL4-rtems project.

And finally run both seL4 and RTEMS on Spike:

$ spike --isa=RV32 -p2 images/sos-image-riscv-spike 

References 


Sunday, February 22, 2015

[HOWTO] 5- Run RTEMS on QEMU

If you're a QEMU fan, and want to give it a try running RTEMS, then this post is for you. Make sure you've followed all of the previous instructions described here [1] [2] [3].

There are some RTEMS sim scripts you can use that do the magic of running simulators for you (but then you'll have to get sim-scripts repo and run it from there). I won't go through sim-scripts here, just do it manually as it's just one command! For more instructions you can peek into the or1ksim README file.

$ vim $HOME/development/rtems/src/rtems/c/src/lib/libbsp/or1k/or1ksim/README
or1sim BSP README


Run

Let's run some interesting sample app called capture now that you can have some interactive fun with.
$ qemu-system-or32 -serial mon:stdio -serial /dev/null -net none -nographic -m 128M -kernel $HOME/development/rtems/build/or1k-rtems4.11/c/or1ksim/testsuites/samples/capture/capture.exe

RTEMS or1ksim/capture.exe running on QEMU

You can try running other samples under sample directory.

References


[HOWTO] 4- Run RTEMS on or1ksim

At this point, you must be enthusiastic enough to see your effort building the toolchain, simulator and RTEMS [1] [2] [3] coming into action, I mean you can now see RTEMS executing literally!


or1ksim simulator needs a script file describing the system architecture, peripherals and CPU version and configurations. RTEMS or1ksim BSP is shipped with such a file that you can see at its source directory.

$ vim $HOME/development/rtems/src/rtems/c/src/lib/libbsp/or1k/or1ksim/sim.cfg
RTEMS sim.cfg
What concerns us about this file is that it sets the UART baud rate and how the output should appear and some debugging options (in case you want to debug).

Run

Now you can run RTEMS hello.exe sample (resulted from your previously built RTEMS) by typing this command:

$  or1k-elf-sim -f $HOME/development/rtems/src/rtems/c/src/lib/libbsp/or1k/or1ksim/sim.cfg $HOME/development/rtems/build/or1k-rtems4.11/c/or1ksim/testsuites/samples/hello/hello.exe

RTEMS hello.exe running on or1ksim
Congratulation! you made it!

Debug

If you want to debug using GDB, you can edit the sim.cfg file to enable debugging, just open it and set enabled option part of the debug section to 1.


As you may have already guessed, you then have to start or1ksim server which will listen to GDB clients on port 50001. Now you do it.

GDB/or1ksim Debugging

References


[HOWTO] 3- Build RTEMS for OpenRISC

If you have not followed the previous tutorial posts describing how to set up your development environment, go ahead and do it [1] [2], I'll be waiting for you to come back again to start building RTEMS for OpenRISC as described here. Currently there is only one RTEMS BSP you can build which runs on both or1ksim and QEMU. Now let's begin.

1- Checking out RTEMS source

$ cd $HOME/development/rtems/src
$ git clone git://git.rtems.org/rtems.git
Cloning into 'rtems'...
remote: Counting objects: 465756, done.
remote: Compressing objects: 100% (81067/81067), done.
remote: Total 465756 (delta 376768), reused 462957 (delta 374743)
Receiving objects: 100% (465756/465756), 63.69 MiB | 83.00 KiB/s, done.
Resolving deltas: 100% (376768/376768), done.
Checking connectivity... done.
2- Bootsrap

The Make build systems requires that you run bootstrap command to generate preinstall.am and Makefile.in files for the first time you download and build RTEMS.

$ cd rtems
$ ./bootstrap -p
$ ./bootstrap

3- Configure and build

Create a new directory for build and configure/build RTEMS for or1ksim BSP.

$ cd ../../
$ mkdir build
$ cd build/

$ ../src/rtems/configure --target=or1k-rtems4.11 --enable-rtemsbsp=or1ksim
$ make

This will generate default samples executable like hello world and ticker, which you can run on or1ksim and QEMU as described on the following tutorial posts.

References

[1] [HOWTO] 1- Build or1k-rtems* toolchain via RSB
[2] [HOWTO] 2- Build or1k simulator(s)

Saturday, February 21, 2015

[HOWTO] 2- Build or1k simulator(s)

So, assuming you're coming from the previous post [HOWTO] 1- Build or1k-rtems* toolchain via RSB and have already installed the or1k toolchain for RTEMS, then you're ready to build RTEMS. But before that, you need OpenRISC simulator to run RTEMS on; this post illustrates how to get some simulator(s) built.

or1ksim

or1ksim the the main or1k simulator, and the one that can run Linux and RTEMS. For more details about or1ksin refer to its web-page [1]. Now, you're supposed to have RSB installed from the previous post [2], you can install the latest or1ksim development code from github as simple as typing just one RSB command (RSB FTW)!

1- Build
$ cd HOME/development/rtems/src/rtems-source-builder/bare/config
$ ../../source-builder/sb-set-builder --log=l-or1ksim.txt --prefix=$HOME/development/rtems/4.11 devel/or1ksim
RTEMS Source Builder - Set Builder, v0.5.0
Build Set: devel/or1ksim
config: devel/or1ksim-1.1.0.cfg
package: or1ksim-1.1.0-x86_64-linux-gnu-1
Creating source directory: sources
download: https://github.com/openrisc/or1ksim/archive/or1k-master.zip -> sources/or1k-master.zip
 redirect: https://codeload.github.com/openrisc/or1ksim/zip/or1k-master
downloading: sources/or1k-master.zip - 2.1MB     
warning: or1k-master.zip: no hash found
building: or1ksim-1.1.0-x86_64-linux-gnu-1
installing: or1ksim-1.1.0-x86_64-linux-gnu-1 -> /home/hesham/development/rtems/4.11
cleaning: or1ksim-1.1.0-x86_64-linux-gnu-1
Build Set: Time 0:00:42.205439

2- Check


Now you want to be sure that this "one command" fetch, build, install really works!

$ ls -alh $HOME/development/rtems/4.11/bin/ | grep sim*
-rwxr-xr-x 1 hesham disk 1.1M Feb 21 16:25 or1k-elf-sim 

QEMU

RTEMS can also work on QEMU, if you do not already have it, you can simply "RSB" it. It'll do full QEMU build for all the architectures supported (that's why it'll take a lot of time).

1- Build


$ cd HOME/development/rtems/src/rtems-source-builder/bare/config
$ ../../source-builder/sb-set-builder --log=l-qemu.txt --prefix=$HOME/development/rtems/4.11 devel/qemu
2- Check


Now that you've more tools than you need, you can proceed to the next posts describing how to build and run RTEMS on one of the previously mentioned simulators.

References


[1] http://opencores.org/or1k/Or1ksim

Thursday, February 19, 2015

Thoughts on Supporting Rump Kernels on RTEMS

Introduction 

So, once I had heard about Rump kernels [1] from Gedare Bloom (one of RTEMS maintainers), I started to do some research about it, and whether RTEMS can have a support for such a new architecture. Rump kernel is a way to run unmodified NetBSD kernel drivers virtually anywhere. So, for a platform that can support Rump kernelsa developer can just pick up some NetBSD drivers (that have been tested and proven to work properly), compile and link it without any modifications to the source code or the host kernel itself. Moreover, these drivers can be even upgraded from NetBSD upstream without any significant effort. So, what's exactly Rump kernel, Anykernel and a so-called platform?

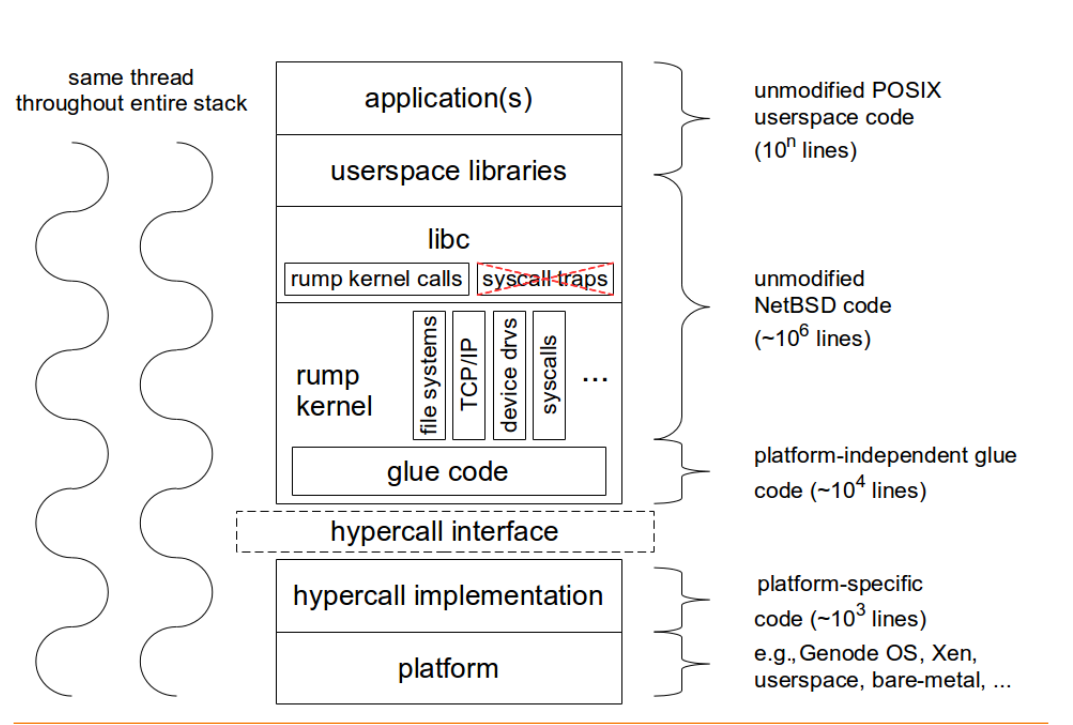
Rump kernel is not a fully-featured OS neither a complete virtual machine like KVM or VirtualBox. It's a minimal thin implementation that enables the host platform (see the platform section) to emulate the system calls layer that NetBSD drivers expect/call. Rump kernel is hardware-agnostic, meaning that it does not depend on specific hardware features like virtualization and cache-coherence. For example, kernel drivers need some way of allocating memory (using rumpuser_malloc), it doesn't really matter whether this is a virtual/logical memory (allocated address space using page-table), or fixed physical addresses; it depends on the platform, what concerns Rump kernels is to freely allocate, use and free this area of memory. That's, Rump kernels try to make use of the underlying software platform features as possible as could be in parallel with giving the illusion (and of course working work-arounds) to the drivers that they get what they need! At this point you may be wondering about the structure of Rump kernels and how it depends/relates to the platform. The following figure [2] may make it clearer. Please note that libc and the layers above it are optional.

Figure 1: Rump Kernel Environment

As you can see, the Rump kernel support is stacked. At the top of the stack comes the application that can be POSIX-compliant. In the next section some of these stack components are illustrated and how RTEMS (as an example platform) can and Rump kernels work together.

Platform


So what's the platform? Basically, the platform can be anything like a raw hardware, Virtual Machines or an OS like Linux. Actually, there are currently some implementations for such platforms. So, Rump kernels can run on some POSIX userspace like "Linux, Android, NetBSD, FreeBSD, OpenBSD, Dragonfly BSD, Solaris (+ derivates) and Windows (via Cygwin)" [3]. There are some implementations that run on bare-metal machines like KVM,VirtualBox or hypervisors like Xen. Genode OS has been modified to support Rump kernel [4] and similarly Minix. So, can RTEMS be the next platform? The simple answer is yes!

RTEMS is an POSIX-compliant RTOS, so with a small effort, Rump Kernel can run above this RTEMS/POSIX environment. However, it would make more sense from performance, control and code density perspectives to discard this POSIX dependency and write the whole hypercall layer (see figure 1). Userspace POSIX platforms here [5] have another POSIX library (userpsace libraries on the previous figure) as well as the host POSIX library. As the authors of Rump Kernels say, it's enough for a platform to just implement the hypercall layer to support the whole Rump kernel stack. So, theoretically, if RTEMS implemented this very thin ~1000-lines-of-code hypercall layer, all other NetBSD code can be imported, providing NetBSD drivers, libc, and even unmodified POSIX library.


The hypercall (AKA rumpuser) layer [7] is divided into basic and IO operations. The complete interface can be found here [6]. Almost all of the functions mentioned in that link can be implemented by using/wrapping existing RTEMS features. Some of the interfaces are mentioned below.

Memory Allocation

int rumpuser_malloc(size_t len, int alignment, void **memp
void rumpuser_free(void *mem, size_t len)
These functions can easily be mapped to RTEMS libcsupport implementation of (malloc/free). Other memory managers like Partition and Region managers can also be used.

Files and IO

int rumpuser_open(const char *name, int mode, int *fdp)
int rumpuser_close(int fd)
int rumpuser_getfileinfo(const char *name, uint64_t *size, int *type)
void rumpuser_bio(int fd, int op, void *data, size_t dlen, int64_t off,
     rump_biodone_fn biodone, void *donearg)
int rumpuser_iovread(int fd, struct rumpuser_iovec *ruiov, size_t iovlen,
     int64_t off, size_t *retv)
int rumpuser_iovwrite(int fd, struct rumpuser_iovec *ruiov,
     size_t iovlen, int64_t off, size_t *retv
int rumpuser_syncfd(int fd, int flags, uint64_t start, uint64_t len) 
The previous IO functions can be implemented by wrapping IMFS and some stubs, most embedded system applications do not need a complete featured file system, but if it's needed, the option of wrapping the correct RTEMS filesystem is still there. How to configure and enable Rump kernel features is an implementation tradoff, but currently rump-posix is doing it by starting a Rump kernel server with a command line flag of which features are needed from the Rump Kernel. For example this command line does such a job (loading a filesystem driver when starting the server)
rumpremote (unix:///tmp/rumpctrlsock)$ ./rumpdyn/bin/rump_server -lrumpvfs unix:///tmp/rumpctrlsock

Clocks

"The hypervisor should support two clocks, one for wall time and one for monotonically increasing time, the latter of which may be based on some arbitrary time (e.g. system boot time). If this is not possible, the hypervisor must make a reasonable effort to retain semantics." [6]
All of the required clock services are provided by RTEMS such as _Watchdog_Ticks_since_boot. RTEMS provides enough time management libraries like Watchdog, Time, Clock manager, Timer benchmark (which may or may not depend on the Clock manager) and CPU Counter (deprecated?). Hence, there are more than enough implementation to support Clocks interface part of the hypercall.

Console output 

"Console output is divided into two routines: a per-character one and printf-like one. The former is used e.g. by the rump kernel's internal printf routine. The latter can be used for direct debug prints e.g. very early on in the rump kernel's bootstrap or when using the in-kernel rou- tine causes too much skew in the debug print results (the hypercall runs outside of the rump kernel and therefore does not cause any locking or scheduling events inside the rump kernel)." [6]
 Both are there!


Threads

int rumpuser_thread_create(void *(*fun)(void *), void *arg,
const char *thrname, int mustjoin, int priority, int cpuidx,
void **cookie)
void rumpuser_thread_exit(void)
int rumpuser_thread_join(void *cookie)
void rumpuser_curlwpop(int enum_rumplwpop, struct lwp *l)

Mainly, all thread management is directly mapped to the host threading implementation. So, when Rump kernel driver creates a thread, the host will actually create this thread and schedule it according to its policy. It does not matter how the host implements threading. For RTEMS, all of these functions can be easily mapped to corresponding ones, no big deal.

Synchronization and Mutexes

Normal mutex operations are provided by RTEMS. There is also a need for Read/Write locks and conditional variables. 

What then?

If we had this hypercall layer on RTEMS, there's no other effort needed. The other BIG NetBSD code can be linked AS IS! At this stage we can try out some NetBSD drivers. We can have some fun by making use of Rump Kernel Remote/Client mode which separates the kernel from the clients (applications). So, for example we can have a bare-metal client connecting to Rump Kernels on RTEMS or vice versa communicating using IPC and TCP/IP. This platform can be setup using some simulators or real hardware. 

One other interesting way is using Rump Kernels to tackle the scalability issues that RTEMS currently faces, providing another solution other than the complex fine-grained locking. We can have cores with attached IO devices that can have Rump kernels on it, and act as servers for other clients (on other cores), communicating together (using inter-processor interrupts, message passing, shared-memory communication or whatever). 

References


[1] http://rumpkernel.org/
[2] Rump Kernels No OS? No Problem!
[3] Rump Kernels Platforms
[4] Genode OS and Rump Kernels.
[5] Userspace (POSIX) Rump kernel.
[6] rumpuser - NetBSD Manual Pages
[7] https://github.com/rumpkernel/buildrump.sh/issues/59

Sunday, August 17, 2014

[GSoC 2014] Porting RTEMS to OpenRISC - Final report

It was a great Google Summer of Code instance this year for me working on a project of my interest (Porting RTEMS to OpenRISC), and achieved a good progress. In this post I will give some implementation details about the parts I worked on, and what has been done so far.

1. CPUKIT


The main low-level part of the OpenRISC CPU port goes there. The port provides configurations of the CPU there. All of the cpukit code I have written is now upstream. The following are the major parts of cpukit already implemented.

1.1 Utility


A new file called or1k-utility.h is added to contain great deal of OpenRISC specific information. Special purpose registers definitions and bit locations and masks within these registers are there. Also, some of the most frequently used functions like _OR1K_mfspr, and _OR1K_mtspr, power management are added. Most of OpenRISC/RTEMS .c files (e.g. BSP clock driver, interrupt handling, UART driver, etc) include this file.

1.2 Interrupt handling


New real-world interrupt handling scheme has been implemented to follow most of other RTEMS ports implementation. Interrupt handling now has stages to go through:

1.1.1 BSP: The very-early executed code starts from the BSP assembly code. Please see or1ksim BSP start.S section below for more details. Once an interrupt is raised, the PC jumps to a specific address at the BSP code, and from there it jumps to _ISR_Handler, a big chuck of assembly code located at cpukit port, and it's the core of interrupt handling.

1.1.2 _ISR_Handler: I consider this the core of interrupt handling for this port. This is a very critical code that needed to be implemented accurately. Initially, it allocates a new space in the interrupted task stack to save CPU_Exception_frame content. CPU_Exception_frame for OpenRISC is shown in the next figure.

CPU_Exception_frame


Once a new space is allocated in the stack, the task context is dumped there. Then nesting level is incremented, and thread dispatching is disabled. At this point, a decision must be made if it's needed to switch the stack to RTEMS SW interrupt stack depending on the nesting level. Once all of the previous actions have been done, the code would be ready to jump to the user C handler.

1.1.3 C Handler: This is the user C handler which can be installed dynamically. Initially, there are default handlers set by the BSP at the startup code. Later, a user can install a new C Handler by calling _CPU_ISR_install_vector(). An example quoted from the or1ksim clock driver, installing the C handler is followed.

or1ksim clock driver install ISR handler 


1.1.4 Restore exception context: After returning from the C handler, a check whether a thread dispatch is necessary, and if so, jump to _Thread_Dispatch. The final action is to restore the previously saved context and return from interrupt.

1.1.5 Default ISR Handler

This is a default ISR C handler that is installed for all interrupt types in the BSP vector table statically at startup code. Later, the code can install other C handlers with vector index if needed. The implementation of this default handler just calls rtems_fatal with exception error code, and CPU_Exception_frame. rtems_fatal in tern, halts the processor and print out the context frame if needed.

default or1k exception handler implementation


The following flowchart shows how interrupts are processed in RTEMS for OpenRISC. 

Flowchart of RTEMS/OpenRISC interrupt processing


1.3 Context Switch 


A major part of any operating system is context switch. This code simply dumps the task context of the currently executing task, and restore the context of the heir task to the processor state making it running. The OpenRISC port only saves/restore preserved registers across function calls.


1.4 cpu.h


This file is provided by every port. It contains CPU configurations, available features, stack growth direction, macros definition, inline functions, and other configurations and CPU specifications every port should provide. For example, enable/disable interrupts are implemented there.

Snippet code of or1k/rtems/cpu.h file


1.5 Power management


Although power management is optional HW feature, I added handling code for targets that supports it. As or1ksim is capable of simulating power management features (sleep mode), the IDLE task could make use of it by going into sleep mode instead of generic IDLE loop.

IDLE Thread body using power management sleep mode

1.6 Context initialize

 
Once a thread is created, its control structure needs to be initialized. The port should implement such a function. The initialization involves setting up the stack pointers, entry point and SR register. In future implementation, TLS and FP implementation support would take a role here.

Context initialize implementation


1.7 Exception frame print


This is a utility function that can be useful for dumping the content of the exception frame in a formatted way.

2. or1ksim BSP


or1ksim is the first BSP for the new OpenRISC port. It's intended to run on or1ksim (the main or1k emulator). It simulates great range of real hardware features. I have worked on implementing the most important parts that most BSPs provide.

2.1 Start.S


This file contains the very early executed code for or1ksim BSP. Once the program starts, a reset interrupt occurs, jumping to _start assembly function. _start is responsible for:


  1. Setup SR registers to Supervision mode.
  2. Load stack and frame pointers.
  3. Clear .bss area.
  4. Jump to boot_card.


It is also responsible for interrupts stuff, providing ISR vector table which contains addresses of user exception C handlers. Initially, this table is setup with default ISR Handler from cpukit (refer to the cpukit, interrupt handling section). Installing a new C handler involves writing to this table. 

or1ksim BSP vector table

Moreover, HW interrupts jump to arbitrary addresses, in which start.S provide generic prologue code that passes vector number to _ISR_Handler before jumping to it.


prologue exception handling instructions at start.S


2.2 Console driver 


Console driver is implemented to enable the BSP to emit some output characters to the console. Most RTEMS tests use console driver (printk, printf), to output some data regarding test results and to notice there behavior. The following figure is an output of running ticker.exe (one of RTEMS test samples) that use both console and clock drivers. It's running on or1ksim and attached to gdb. 

ticker.exe output


2.3 Clock driver


Clock driver is needed for any BSP/target that needs multi-tasking (i.e, context switch) and operating systems scheduling features. OpenRISC has only one timer called tick timer. The or1ksim BSP provides clock driver initialization that setup necessary registers, tick time, installing Clock_isr C handler, and enable tick timer interrupts. RTEMS uses tick timer restart mode, so when a tick interrupt occurs it restart itself and count from zero again. Also or1ksim clock driver implementation provides a function called or1ksim_clock_at_tick which is executed part of the RTEMS Clock_isr C handler to do HW specific actions. For OpenRISC, it just clears pending interrupts, setup the TTMR register again, and reset TTCR (timer counter) to zero (optional). Please note that or1ksim is not accurate regarding timing.

2.4 Timer benchmark


Simple timer benchmark driver is provided to run some tests that help profiling and calculating some performance statistics. It's mainly based on the clock driver.

3. toolchain


At early stages of the project, I had to work on the GNU toolchain to support building RTEMS for or1k targets. The work involved adding some configurations and modifying scripts to add or1k-rtems* and similar stuff. The following status of the toolchain is supplied at the time of this post was written. It may be changed later.

3.1 binutils


By now, OpenRISC folks pushed their new or1k support upstream to cvs and that included my work. So, binutils can be built for both or1k-elf and or1k-rtems* targets by cloning cvs target. This work would be included in the next binutils release (2.25?)

3.2 newlib 


I had to work on newlib library as it's used by RTEMS as the main embedded library instead of libgcc. We (RTEMS and OpenRISC communities) discussed about some licence issues, and RTEMS community took a decision to avoid the licence problem. The OpenRISC GPL newlib code might be rejected by sourceware, so, I had to provide a complete minimal port for OpenRISC/RTEMS to newlib. It's now upstream and can be built from RSB or manually. By doing that, we avoided the possibility that newlib from OpenRISC folks might be rejected. Later, when OpenRISC people want to push their code (after resolving these licence issues), they would have to adapt, modify, and add to my upstream code there.

3.3 gcc


OpenRISC community is working hard to push their gcc work upstream. I expect that to happen soon. I may be lucky enough to be one of the contributors of the early or1k gcc port when it's upstream.

3.4 gdb


gdb code (both OpenRISC and my RTEMS additions) may have to be delayed from being merged upstream. In the time being, or1k-rtems* toolchain is using a big bulk patch from my repository for building gdb7-7 release for or1k-rtems4.11-gdb. Hopefully, OpenRISC would push the code soon.

3.5 or1ksim


or1ksim can be built and run as described in OpenRISC instructions page. No additional work needed to run for RTEMS except sim.cfg, which is provided in my repo.

3.6 RSB


RSB (RTEMS Source Builder) is a great tool to build all the toolchain (i.e, binutils, newlib/gcc, gdb, or1ksim) from source on many platforms and operating systems. It's created and maintained by Chris Johns who mentored my this GSoC instance. I have added support for RSB to build the tools for or1k-rtems*-*. I am using Linux to build the toolchain, however, Chris stated recently that RSB can run on Windows, including the new or1k-rtems*-* toolchain.

References 

[1] RTEMS 

Wednesday, June 25, 2014

[HOWTO] build and run RTEMS on or1ksim

This post describes how to build, configure RTEMS to run on or1ksim emulator. Installing the tool-chain is a prerequisite before applying the steps in this post; if you have not already installed them, check out the steps here and do it. Once the tool-chain are installed and seen in the executable path, you may proceed with the following steps.

1- Set up the work space.

$ mkdir ~/rtems-dev
$ cd ~/rtems-dev

2- Clone my RTEMS project repo


This is temporary, by the end of the project, all the code at my repo should be upstreamed to RTEMS.

$ git clone git@github.com:heshamelmatary/rtems-gsoc2014.git
$ cd rtems-gsoc2014

3- Switch to or1k branch


I have created a branch for the project to help me with arranging and generating patches against master; meanwhile, keep master branch synchronized with remote.

$ git checkout or1k

4- bootstrap


$ bootstrap -p
$ bootstrap

5- Configuring and building 


$ cd ../
$ mkdir b-rtems
$ cd b-rtems
$ ../rtems-gsoc2014/configure --target=or1k-rtems4.11 --enable-rtemsbsp=or1k_or1ksim --disable-posix --disable-itron --disable-networking --disable-smp

You should get hello and ticker applications in their executable form. Other applications/tests will fail to compile because of other features/implementations that are not supported yet.

Running and debugging hello.exe


1- First you should have an or1ksim configuration script suitable for or1ksim BSP. This is the sim.cfg file I use at this stage of the project. It should be placed at your home directory. Note that as long as more features like: FP, cache manager, MMU manager are added, this file has to be changed to simulate these functionalists on or1ksim.

2- Run hello application on or1ksim.

The configuration file uses RSP (remote protocol) to enable GDB to connect to or1ksim. So, when running or1ksim, it reads configuration script, loads the program into the proper addresses, and waits for GDB to connect.

$ cd $HOME/rtems-dev/b-rtems/or1k-rtems4.11/c/or1k_or1ksim/testsuites/samples/hello/
$ or32-elf-sim -f ~/sim.cfg hello.exe

You should get something similar to the following picture:


3- Run GDB and connect to or1ksim 

From another terminal run GDB and connect to or1ksim

$ or1k-rtems4.11-gdb $HOME/rtems-dev/b-rtems/or1k-rtems4.11/c/or1k_or1ksim/testsuites/samples/hello/hello.exe

From gdb, attach it to or1ksim

(gdb) target remote :50001 
(gdb) continue

UART should emit the string output to or1ksim (and any other channel you provided in configuration script)


References 


RTEMS kernel port for OpenRISC | Status Report - 25062014

As introduced before, this year I'm porting RTEMS to OpenRISC 1000 architecture during GSoC program. Other than getting the tool-chain built for RTEMS, the project is mainly about RTEMS kernel. In this post, I'll list the latest updates, concerning RTEMS kernel, that have been achieved so far. The current status is that RTEMS hello and ticker samples can run on or1ksim (see HOTWO build and run RTEMS for OpenRISC).

The code is in its earlier stages, and there is a lot more to do; though, the current code is fairly simple enough that allows anyone to build RTEMS and get hello and ticker samples exes. The project is spread out across RTEMS main components (directories):

CPUKIT


Other than generic APIs, this directory should include shared stuff for any CPU that RTEMS supports; and now it includes or1k. Mainly, it provides details, definitions, configurations, and code for each CPU family for a given architecture. For or1k, the only family is OR1200. It contains processor configurations and properties embedded in .h, .c .S files like:
  • In which direction the stack grows. For or1200 the stack is growing down.
  • FP unit presence. There is no handling code for FP currently, it's on my TODO list.
  • Endianess. Big endian.
  • Context Control. This is a structure containing necessary processor context (registers) to be saved/retrieved during context switches. Currently, all general purpose registers are saved as well as supervision register; this is to be optimized in the future.
  • Processor definitions. This includes macros for first group of registers that all architectures should implement; most notably supervision register. 
  • Context Initialize. This function is implemented to support RTEMS multi-tasking. Initially, it sets elements of Context Control struct including: beginning address of the stack into sp (stack pointer) register and fp (frame pointer) register, loading lr (link register) and sr (supervision register). It's called part of the process of starting multi-tasking.
  • Context Switch. The most important function for multi-tasking. Functionality of context switching is supplied via an assembly file called or1k-context-switch.S. This file contains or1k assembly instructions for saving/restoring processor context. It's always invoked for any multi-tasking application.  

There is not any cache or MMU managers currently, this is on my TODO list.

LIBBSP


libbsp is directory that includes every BSP (Board Support Package) for each architecture. For or1k, a new or1ksim BSP is added as an interface to or1k port; it's intended to run on or1ksim emulator. The new BSP contains:

start code


start code is the entry point for the program; it's resposible for providing abstract ISR handlers. For or1ksim, reset and timer handlers are the only statically installed handlers currently. _reset simply jumps to _start which does the following:
  1. Load stack and frame pointers.
  2. Clear .bss section. 
  3. Call bootcard function.
bootcard is a major part for linking BSPs and CPUKIT libraries, it acts as a coordinator from the beginning of initializing the board along with initializing RTEMS data structures, initializing drivers, multi-tasking, etc. The steps an application goes through from the time the first BSP code is executed until the first application task executes are illustrated in the following figure.


linkcmds


This is the linker script describing how the exe code will fit into memory, defining linker symbols that are used in other areas of RTEMS, and handling alignments. The structure of how or1ksim BSP utilizes memory is described in the following figure.


linker symbols 


linker-symbols.h externs all linker symbols for other RTEMS components that may use it. For example, this file is required for initializing context control (in cpukit), zeroing .bss section, and initializing stack and frame registers.


Console driver


Console driver is using UART. For or1ksim simulator, a configuration script is provided to map UART registers to base address 0x90000000. It's working on 115200 baud rate. The process of initializing the console driver includes initializing UART control. Also, the driver implements send_char(), which is used to implement printf, printk within higher layers. Currently, this is the only way we can get output to stdout. or1ksim can be configured to use xterm, tty0, or other channels for rx and/or tx.


Clock driver


Clock driver is essential for RTEMS scheduling purposes and some applications like ticker. The current clock driver implements initialization and tick facility. It should install the tick timer handler into the proper vector location and generate timer interrupt every N ticks. Number of ticks that fire an interrupt is calculated from some RTEMS configurations and the board frequency (100 MHz for or1ksim).  


The clock driver currently is not working in real-time, however, it makes multi-tasking and scheduling working. This issue is to be fixed soon. Also, on my TODO list, the implementation of RTEMS timer benchmark.

IRQ 


IRQ implementation is almost null; once creating IRQ manager for or1ksim (next task), I will generate patches for or1k port to RTEMS to be upstreamed.

In the following post, I will describe HOWTO get, configure, install, run, debug RTEMS application samples (hello and ticker) from my repo. Eventually (by the end of the project), all this code should be upstreamed to RTEMS so that anyone can build RTEMS for or1k like any other target.

References